Print Template
Overview
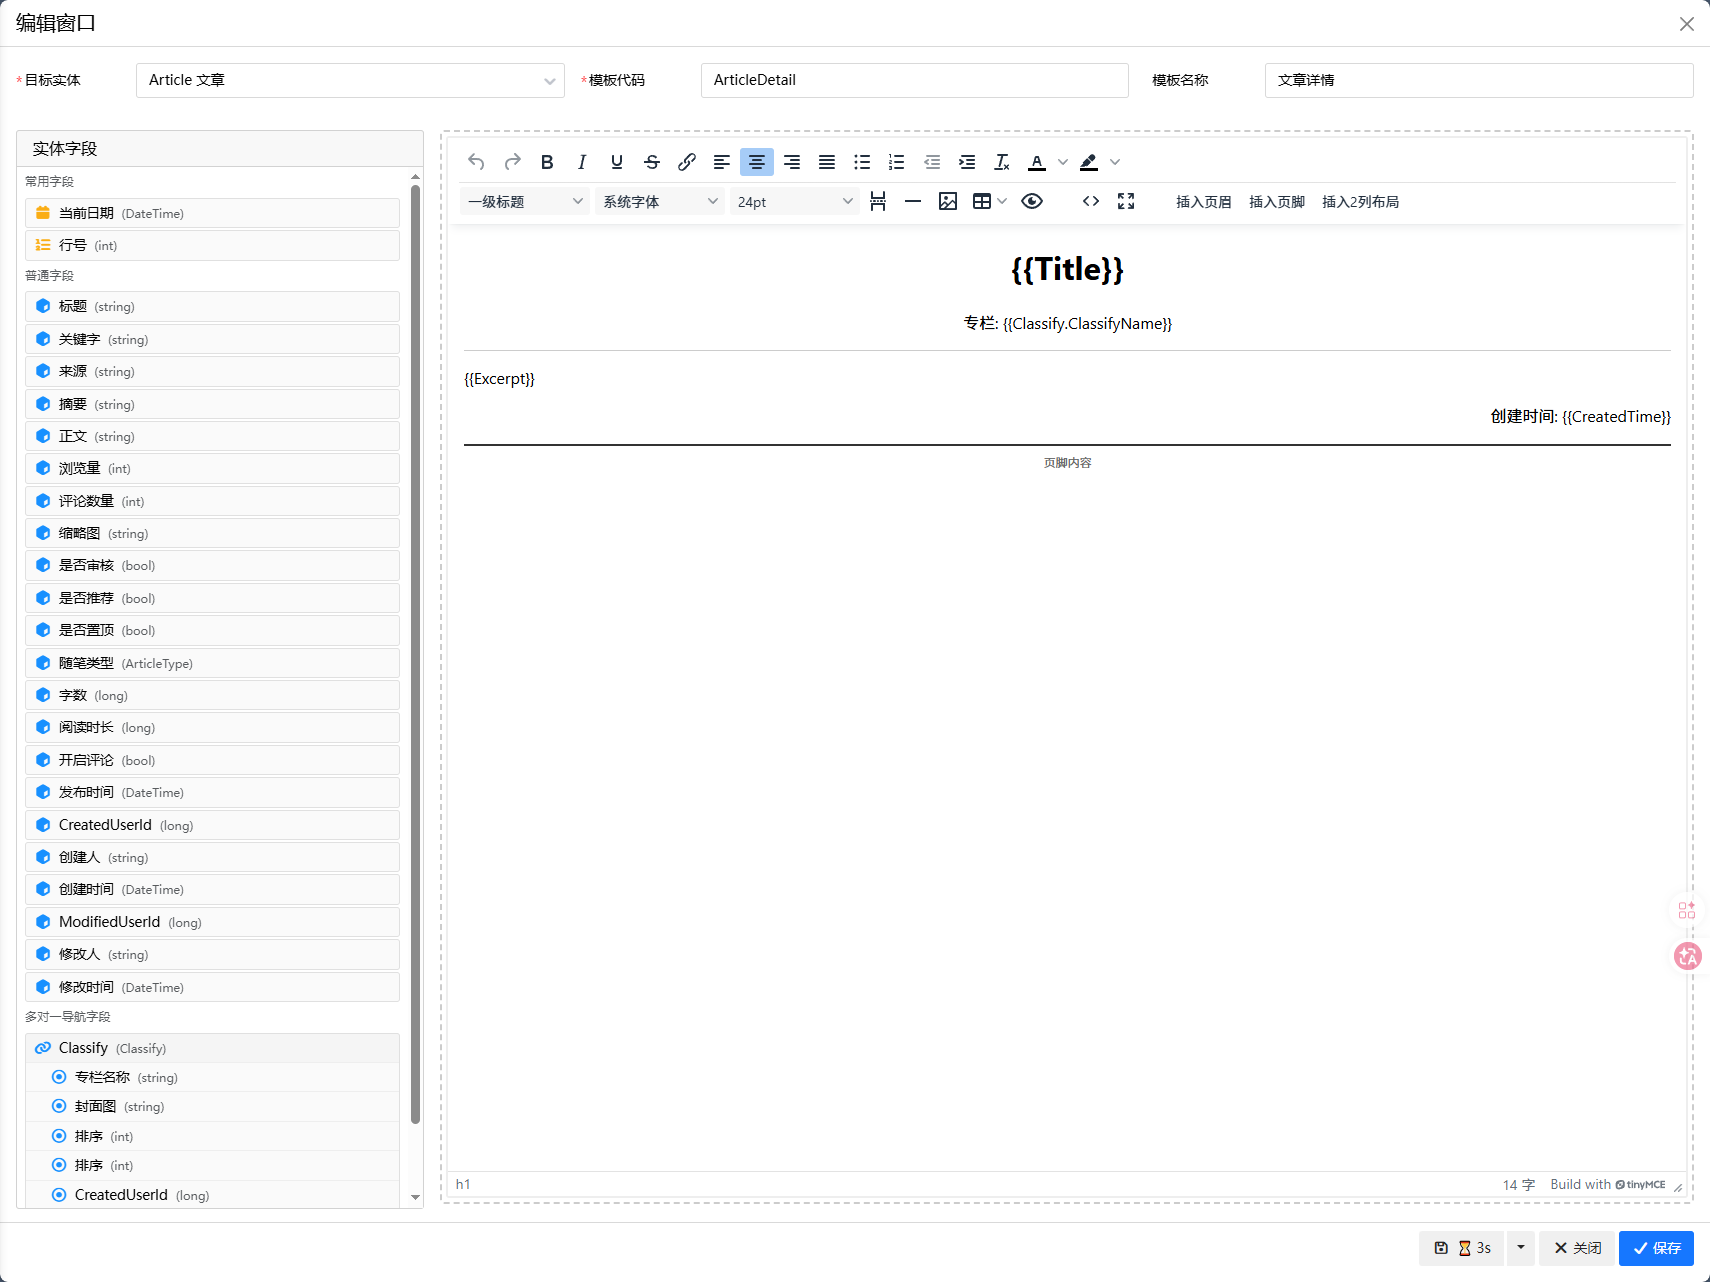
The Print Template module is a visual report designer based on the TinyMCE rich text editor. It supports drag-and-drop template design with advanced features such as headers/footers, 2-column layouts, and one-to-many sub-tables. Designed templates can be printed with one click from list pages or detail pages.
Features
- Visual Design: WYSIWYG editing powered by TinyMCE
- Drag & Drop Fields: Drag entity fields from the field tree into the editor
- Field Type Support:
- Regular fields (string, number, date, etc.)
- Built-in variables (
RowNumber,CurrentDate) - ManyToOne navigation properties (e.g.,
UserName→NickName) - OneToMany / ManyToMany collection navigations (auto-rendered as sub-tables)
- Header/Footer: Insert header/footer regions via toolbar, automatically repeated on every page
- 2-Column Layout: One-click insertion of flexible two-column layouts
- Page Break: Manual page break control
- Template Management: Support multiple templates per entity type
- Standalone Print Service:
PrintServicecan be injected into any page
Access
- Template List: Click the print button in any
AdminTabletoolbar (requires configured templates) - Template Management: Find "Print Template" in the system menu
Quick Start
1. Create a Print Template
- Navigate to System Menu → "Print Template" (
/Admin/PrintTemplate) - Click Add, enter the template name (English letters only) and target entity type
- Just drag and drop the fields, edit the style, and save
2. Design the Template
The designer consists of three areas:
| Area | Description |
|---|---|
| Left Field Tree | All available fields of the current entity, grouped by type (Regular / System Variables / ManyToOne / OneToMany) |
| Center Editor | TinyMCE rich text editor for free-form styling, tables, images, and text |
| Toolbar | Print-specific buttons: Header, Footer, 2-Column Layout, Page Break |
Steps:
- Drag fields from the left field tree into the editor —
{{FieldName}}placeholders are inserted automatically - Use toolbar buttons to insert headers/footers, 2-column layouts, and page breaks
- Edit text, adjust styles, insert images and tables directly in the editor
- Save the template
3. Printing
Print from List Page
- Select the records to print (multi-select supported)
- Click the
Printbutton in the toolbar - If multiple templates exist for the entity, a dropdown menu appears for selection
- The browser print dialog opens automatically
Print from Any Page (via PrintService)
@inject EasyAdminBlazor.PrintService PrintService

@code {
    async Task PrintRecords()
    {
        // Auto-detect template by entity type
        await PrintService.PrintAsync("EasyAdminBlazor.SysUser", new long[] { 1, 2, 3 });

        // Print by template ID
        await PrintService.PrintAsync(templateId, new long[] { 1, 2, 3 });

        // Print with specific template name
        await PrintService.PrintAsync("EasyAdminBlazor.SysUser", ids, "UserInfoTemplate");

        // Get rendered HTML only (no print dialog)
        var html = await PrintService.RenderPrintHtmlAsync(templateId, ids);
    }
}
Template Syntax
Placeholders
Use {{PropertyName}} as data placeholders in templates:
| Syntax | Description | Example |
|---|---|---|
{{PropertyName}} |
Regular field | {{Name}} → "John" |
{{RowNumber}} |
Row number (1-based) | {{RowNumber}} → "1" |
{{CurrentDate}} |
Current date | {{CurrentDate}} → "2026-06-17" |
{{Navigation.SubProperty}} |
ManyToOne related field | {{User.NickName}} → "Admin" |
Sub-Tables
For OneToMany / ManyToMany collection navigation properties, use <table data-nav-name="PropertyName">:
<table data-nav-name="OrderItems" border="1" style="width: 100%;">
    <thead>
        <tr>
            <th>Product</th>
            <th>Price</th>
            <th>Quantity</th>
        </tr>
    </thead>
    <tbody>
        <tr>
            <td>{{OrderItems.ProductName}}</td>
            <td>{{OrderItems.Price}}</td>
            <td>{{OrderItems.Quantity}}</td>
        </tr>
    </tbody>
</table>
data-nav-namemust match the navigation property name- Rows inside
<tbody>are template rows, repeated for each child record {{RowNumber}}inside sub-tables represents the child record's row number
Header/Footer
<div class="print-header">
    <h3>Company Report</h3>
    <small>Print Date: {{CurrentDate}}</small>
</div>

<div class="print-footer">
    <p>Page {{RowNumber}}</p>
</div>
- Headers repeat at the top of every page
- Footers are sticky at the bottom of every page
- Automatic page breaks (
page-break-after: always)
2-Column Layout
Use the "2 Columns" toolbar button to insert:
<div style="display: flex; gap: 20px;">
    <div style="flex: 1;">Left content</div>
    <div style="flex: 1;">Right content</div>
</div>
PrintService API
PrintService is registered as a Scoped service and can be injected into any Razor component.
| Method | Parameters | Description |
|---|---|---|
LoadPrintTemplatesAsync |
entityTypeName |
Load all templates for an entity |
RenderPrintHtmlAsync |
(templateId, ids) |
Render HTML by template ID |
RenderPrintHtmlAsync |
(entityTypeName, ids, templateName?) |
Render HTML by entity type |
PrintAsync |
(templateId, ids) |
Print directly by template ID |
PrintAsync |
(entityTypeName, ids, templateName?) |
Print directly by entity type |
Parameters:
entityTypeName: Full type name of the entity, e.g.EasyAdminBlazor.SysUserids: List of record IDs to printtemplateId: Print template IDtemplateName: Optional template name, matchesNameorDescription
Configuration
Template fields:
| Field | Type | Description |
|---|---|---|
Name |
string | Template name, English letters only (regex: ^[A-Za-z]+$) |
TargetEntity |
string | Target entity full type name |
HtmlContent |
string | Template HTML content (auto-generated by designer) |
Description |
string | Template description / notes |
Notes
- Template names support English letters only (no Chinese or special characters)
- The designer uses TinyMCE 8.3.2 (loaded from CDN)
- Click the editor area first to activate TinyMCE before dragging fields
- One-to-many sub-tables require manually inserting
<table data-nav-name="PropertyName">in the editor report-designer.jsis loaded automatically (via sync XHR) before printing — no manual script reference needed